Recent Posts
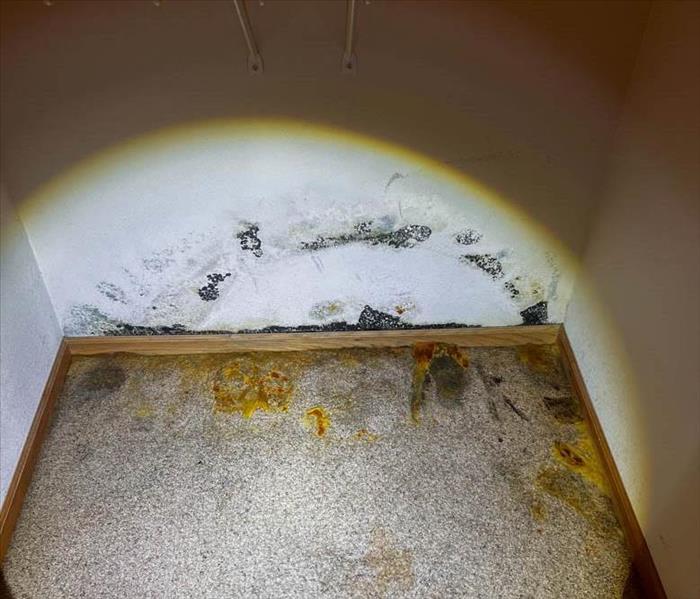
Mold in Schools: Risks and Prevention Measures
7/8/2024 (Permalink)
Mold growth in schools can present a variety of challenges for administrators, teachers, and students alike. While mold itself can be dangerous, its presence can lead to unpleasant odors, aesthetic concerns, and potential damage to school property. In this blog, we'll explore the risks associated with mold in schools and discuss proactive prevention measures to address this issue effectively.
Understanding the Risks
Mold is a type of fungus that thrives in damp, humid environments. In schools, mold growth can occur in areas with excess moisture, such as bathrooms, kitchens, and basements. While mold itself may not directly cause health issues, it can exacerbate respiratory problems in individuals with allergies or asthma. Additionally, mold can produce unpleasant odors and cause discoloration of surfaces, detracting from the overall cleanliness and appearance of the school environment.
Impact on Learning Environment
The presence of mold in schools can also impact the learning environment. Mold growth may result in the closure of classrooms or entire school buildings for remediation, disrupting educational activities and inconveniencing students and staff. Furthermore, the perception of mold in schools can negatively affect the school's reputation and credibility within the community.
Prevention Measures
Preventing mold growth in schools requires a proactive and multi-faceted approach. Here are some key prevention measures to consider:
- Maintain Proper Ventilation: Adequate ventilation is essential for reducing humidity levels and preventing moisture buildup, which can contribute to mold growth. Ensure that ventilation systems are properly maintained and functioning effectively.
- Address Moisture Issues Promptly: Address any water leaks, spills, or plumbing issues promptly to prevent excess moisture accumulation. Inspect bathrooms, kitchens, and other areas prone to moisture regularly and take corrective action as needed.
- Control Indoor Humidity: Keep indoor humidity levels below 60% to discourage mold growth. Use dehumidifiers in areas with high humidity and consider installing moisture meters to monitor humidity levels.
- Clean and Maintain HVAC Systems: Regularly clean and maintain HVAC systems to prevent mold growth in ductwork and air handling units. Replace filters as recommended and schedule professional inspections and cleanings as needed.
- Promote Good Housekeeping Practices: Encourage staff and students to practice good housekeeping habits, such as promptly cleaning up spills and avoiding leaving wet items or food debris in classrooms or common areas.
- Monitor Building Conditions: Regularly inspect school buildings for signs of water damage, such as stained ceilings, damp walls, or musty odors. Address any issues promptly to prevent mold growth and mitigate potential damage.
- Educate Staff and Students: Provide training and educational materials to staff and students on mold prevention and the importance of maintaining a clean and healthy school environment. Encourage proactive participation in mold prevention efforts.
Mold growth in schools can pose challenges for administrators, teachers, and students, impacting the cleanliness, safety, and functionality of the learning environment. While mold itself can cause damage, its presence can lead to aesthetic concerns, property damage, and disruptions to educational activities. By implementing proactive prevention measures, schools can minimize the risk of mold growth and create a clean, healthy, and conducive learning environment for all occupants.
How Weather Conditions Affect Water Damage Risks
6/12/2024 (Permalink)
 If water damage does occur, don't hesitate to contact SERVPRO.
As the seasons change and weather patterns fluctuate, so do the risks of water damage to your property. From heavy rainstorms to freezing temperatures, various weather conditions can pose significant threats to your home or business. At SERVPRO®, we understand the importance of being prepared and informed about these risks. In this blog post, we'll explore how different weather conditions can impact your property and what steps you can take to mitigate water damage.
Heavy Rainstorms
During periods of heavy rain, the risk of water damage significantly increases. Excessive rainfall can overwhelm drainage systems, leading to flooding in basements, crawl spaces, and other low-lying areas. Additionally, roof leaks and compromised seals around windows and doors can allow water to seep into your property. To minimize the risk of water damage during heavy rainstorms, ensure that your gutters and downspouts are clear of debris and that your roof is in good condition.
Freezing Temperatures
When temperatures drop below freezing, the risk of frozen pipes and subsequent water damage rises. Frozen pipes can burst, causing extensive water damage to your property. To prevent frozen pipes, insulate exposed pipes, especially those in unheated areas such as basements, attics, and crawl spaces. Additionally, allow faucets to drip during cold snaps to relieve pressure within the pipes.
Thawing Snow and Ice
As snow and ice begin to thaw, they can pose their own set of challenges. Melting snow can seep into cracks in your foundation or roof, leading to water damage over time. Ice dams, which form along the edge of roofs, can also cause water to back up and infiltrate your property. Proper insulation and ventilation in your attic can help prevent ice dams from forming, while maintaining clear pathways for melted snow to drain away from your home can reduce the risk of water damage.
Severe Weather Events
Severe weather events such as hurricanes, tornadoes, and storms can cause widespread water damage in their wake. High winds, storm surges, and torrential rain can all contribute to flooding and structural damage. While it's impossible to control the weather, having a comprehensive emergency preparedness plan in place can help minimize the impact of severe weather events on your property.
By understanding how weather conditions can affect water damage risks, you can take proactive measures to protect your property. However, if water damage does occur, don't hesitate to contact SERVPRO. Our team of professionals is available 24/7 to provide emergency water damage restoration services and help you get back to normal as quickly as possible. Stay informed, stay prepared, and stay safe!
Flash Floods vs. River Flooding: Know the Difference
5/15/2024 (Permalink)
 By knowing the differences between them, you can better develop a storm damage plan and protect your property from potential water damage.
When it comes to dealing with storm emergencies, understanding the different types of flooding is crucial for effective preparation and response. Flash floods and river floods are two common types of flooding, each with their unique characteristics and risks. By knowing the differences between them, you can better develop a storm damage plan and protect your property from potential water damage.
Flash Floods
Flash floods are rapid and intense floods that can occur within minutes or hours of heavy rainfall or the sudden release of pent-up water. These floods are characterized by their swiftness and unpredictability, making them highly dangerous. Flash floods often result in a sudden surge of water that can quickly engulf roads, homes, and other structures. They are particularly common in urban areas with impermeable surfaces that prevent water from being absorbed into the ground.
One of the key challenges of flash floods is the lack of warning time. Due to their rapid onset, it can be difficult to evacuate or take preventive measures in time. As a result, flash flooding poses a significant risk to life and property. Developing an emergency response plan that includes evacuation routes and early warning systems is crucial when living in an area prone to flash floods.
River Flooding
River flooding, on the other hand, is a slower type of flooding that occurs when rivers or other bodies of water exceed their capacity and overflow onto surrounding land. Unlike flash floods, river flooding typically develops over days or even weeks, giving residents more time to prepare and respond. River flooding is often caused by persistent heavy rainfall, snowmelt, or a combination of both.
One of the main challenges of river flooding is its potential for long-lasting devastation. Floodwaters can linger for an extended period, leading to prolonged disruptions and damage to homes and infrastructure. Living in a flood-prone area requires having a comprehensive storm damage plan that includes measures such as building levees, and floodwalls, and maintaining proper insurance coverage.
Key Differences
The primary difference between flash floods and river flooding lies in their onset and duration. Flash floods are sudden and short-lived, while river flooding is gradual and long-lasting. Understanding the distinctions between these two types of flooding is essential for effective mitigation and response strategies.
In conclusion, knowing the differences between flash floods and river flooding is crucial for developing a comprehensive storm emergency plan. By being aware of the risks associated with each type of flooding, homeowners and communities can better prepare for potential water damage and take proactive measures to safeguard their property. Remember to stay informed, have a plan in place, and work with professionals like SERVPRO® to minimize the impact of flooding on your home or business.
Essential Tips for Preventing Candle Fires in Your Home
4/17/2024 (Permalink)
 In this blog, we will explore tips for preventing candle fires and ensuring the safety of your home.
Candles add a warm and cozy ambiance to any home, but if not used properly, they can pose a significant fire hazard. Candle fires can result in devastating fire damage and the need for extensive fire remediation and smoke damage restoration. By following some essential safety precautions, you can enjoy the beauty of candles in your home while minimizing the risk of fire. In this blog, we will explore tips for preventing candle fires and ensuring the safety of your home.
Never Leave Unattended Candles
One of the most critical rules for preventing candle fires is to never leave a lit candle unattended. Always extinguish candles before leaving the room or going to sleep. A momentary distraction or a draft of air can quickly lead to a dangerous fire.
Keep Candles Away from Flammable Materials
Ensure that candles are placed in a sturdy candle holder on a stable surface. Keep them away from flammable materials such as curtains, bedding, paper, or furniture. Maintaining a minimum distance of one foot between a lit candle and any flammable item is a recommended safety practice.
Use Proper Candle Holders
When using candles, choose appropriate candle holders that are non-combustible and can securely hold the candle. Opt for holders that fully surround the flame and are made of materials like glass, ceramic, or metal. Avoid using plastic or wooden holders, as they can easily catch fire.
Place Candles in Draft-Free Areas
Avoid placing candles in drafty areas or near air vents. Drafts can cause candles to tip over or flare up unexpectedly, increasing the risk of fire. Keep candles away from windows, ceiling fans, and areas with heavy foot traffic.
Trim Candle Wicks
Before lighting a candle, trim the wick to approximately ¼ inch. Long or crooked wicks can cause uneven burning and excessive flame height, increasing the risk of accidents. Properly trimmed wicks can help ensure a more controlled and safer burning experience.
Avoid Overcrowding
When using multiple candles, ensure they are adequately spaced apart to prevent overheating and accidental contact between flames. Overcrowding candles can lead to rapid heat buildup, melting nearby surfaces, and potentially causing a fire.
Extinguish Candles Properly
When extinguishing a candle, use a snuffer or gently blow out the flame. Avoid using water to put out candles, as it can cause hot wax to splatter and can potentially lead to a fire. Ensure that the candle is completely extinguished and the wick is no longer glowing before leaving the area.
Consider Alternatives
If you are concerned about fire hazards or prefer a low-maintenance option, consider using flameless LED candles. These candles mimic the appearance of real candles without the risk of fire. They are safe to use around children and pets and eliminate the need for fire damage restoration and cleanup.
Candles can add warmth and ambiance to your home but must be used with caution. By following these essential tips for preventing candle fires, you can enjoy the beauty of candles while minimizing the risk of fire damage. Remember to always remain vigilant and take the necessary precautions to ensure the safety of your home and loved ones. In the event of a candle fire or any fire-related incident, seek professional assistance for fire remediation and smoke damage restoration from experts like SERVPRO® who can help restore your home to its pre-damage condition.
Mold and Your Home's Structural Integrity
3/7/2024 (Permalink)
 SERVPRO is ready to take on your project anytime day or night.
Mold is not just an unsightly nuisance; it can also pose risks to the structural integrity of your home. Understanding the potential impact of mold on your property is crucial for homeowners. In this blog post, we'll explore the connection between mold and your home's structural integrity, as well as practical solutions to address and prevent mold-related issues.
How Mold Affects Structural Integrity
Mold thrives in damp and humid environments, making homes susceptible to its growth, especially in areas with water damage or high humidity levels. Mold can feed on organic materials present in building structures, such as wood, drywall, and insulation. Over time, prolonged exposure to mold can weaken these materials, compromising the structural integrity of your home.
Identifying Mold-Prone Areas
Certain areas of your home are more prone to mold growth due to factors like poor ventilation, water leaks, or high humidity. Pay close attention to spaces such as basements, attics, crawl spaces, and bathrooms. Regular inspections of these areas can help you identify early signs of mold and prevent it from causing extensive damage.
The Role of Moisture Control
Controlling moisture is a key factor in preventing mold and preserving your home's structural integrity. Address water leaks promptly, ensure proper ventilation in damp areas, and consider using dehumidifiers in spaces prone to high humidity. By controlling moisture, you create an environment less conducive to mold growth and protect your home from potential structural issues.
Regular Inspections and Maintenance
Regular home inspections and maintenance routines are essential for catching mold issues early on. Check for signs of water damage, such as stains on walls or ceilings, and address any leaks immediately. Inspect your roof, windows, and foundation for potential entry points where water could infiltrate, and seal any gaps or cracks to prevent moisture intrusion.
Professional Mold Remediation
If you discover mold in your home, it's crucial to enlist the help of professionals for mold remediation. Certified experts, like SERVPRO®, can assess the extent of the mold damage, develop a comprehensive remediation plan, and restore your home to a safe condition. Professional mold remediation is essential for ensuring that the mold is thoroughly and safely removed, preventing further structural damage.
Proper Ventilation
Proper ventilation is a key preventive measure against mold growth. Ensure that your home is well-ventilated, especially in areas prone to dampness. Use exhaust fans in bathrooms and kitchens, open windows when weather permits, and consider installing ventilation systems to improve air circulation and reduce humidity.
Regular Cleaning and Maintenance
Routine cleaning and maintenance of your home can significantly contribute to mold prevention. Keep surfaces dry, clean gutters regularly to prevent water buildup, and address any leaks or water damage promptly. Regular cleaning practices help eliminate the conditions that promote mold growth and protect your home's structural integrity.
Addressing Water Intrusion Immediately
Water intrusion is a primary contributor to mold growth and structural damage. Whether it's a leaky roof, plumbing issue, or foundation crack, address water intrusion immediately. Identify and fix the source of the problem to prevent ongoing moisture buildup and safeguard your home from potential structural issues.
Understanding the connection between mold and your home's structural integrity is vital for homeowners. By taking proactive measures, such as controlling moisture, conducting regular inspections, and enlisting professional mold remediation services when needed, you can protect your home from the detrimental effects of mold and ensure its long-term structural stability. Trust SERVPRO® to be your partner in addressing mold-related concerns and preserving the integrity of your home.
Strengthening Your Home Against Floods: Tips to Boost Flood Resilience
2/14/2024 (Permalink)
 Our team is equipped to assist you in mitigating flood-related damages and restoring your home after a flood event.
Floods can pose a serious threat to homes, causing extensive damage and disruption to daily life. Building flood resilience is key to minimizing the impact of potential flood events on your home. In this blog, we'll explore practical strategies and measures to increase your home's flood resilience, ensuring better protection against flood-related damages.
1. Understanding Your Home's Vulnerabilities
Start by assessing your home's vulnerabilities to flooding. Identify areas prone to water ingress such as basements, ground-level entrances, windows, and doors. Understanding these weak points helps in developing targeted strategies to fortify your home.
2. Implementing Protective Barriers and Seals
Invest in flood barriers, sandbags, or flood shields to create a protective barrier around vulnerable entry points. Seal gaps and cracks in walls, windows, and doors with waterproof sealants or flood-resistant materials to prevent water intrusion.
3. Elevating Electrical Systems and Appliances
Raise electrical systems, fuse boxes, HVAC units, and appliances above potential flood levels. Elevating these systems above flood-prone areas can prevent damage and reduce the risk of electrical hazards during a flood.
4. Landscaping for Water Diversion
Modify your landscaping to redirect water away from your home. Properly graded yards and the installation of swales, berms, or French drains can divert water away from the foundation, reducing the risk of water pooling around your home.
5. Installing Sump Pumps and Backflow Valves
Consider installing a sump pump in the basement or low-lying areas to remove excess water. Backflow valves can prevent sewage backup into your home during flooding, safeguarding against contamination.
6. Waterproofing Basements and Foundations
Waterproofing your basement and foundation walls with coatings or membranes helps create a barrier against water seepage. Consider professional waterproofing services for effective and long-lasting solutions.
7. Obtaining Flood Insurance
Flood insurance provides financial protection against flood-related damages. Even if you're not in a high-risk flood zone, having flood insurance adds an extra layer of security in case of unexpected flooding.
8. Creating an Emergency Plan
Develop a comprehensive flood emergency plan for your family. Include evacuation routes, emergency contact information, and procedures for shutting off utilities. Practice this plan regularly to ensure everyone knows what to do in case of a flood.
Increasing your home's flood resilience involves a combination of preventive measures, structural improvements, and preparedness. By implementing these strategies and investing in protective measures, you can significantly reduce the impact of potential floods on your home and safeguard your family and belongings.
At SERVPRO of Carthage/Joplin, we understand the importance of flood resilience. Our team is equipped to assist you in mitigating flood-related damages and restoring your home after a flood event. Contact us for expert restoration services to increase your home's flood resilience!
Why Quick Roof Repairs After a Storm are Important
1/17/2024 (Permalink)
When storms unleash their fury, your roof stands as the first line of defense against the elements. In this blog, we'll highlight the crucial importance of acting swiftly with roof repairs after a storm, offering insights to protect your home from further damage.
Preventing Water Leaks
A damaged roof is an open invitation to water leaks. Swift roof repairs are essential to prevent rainwater from seeping into your home, causing structural damage, compromising insulation, and fostering mold growth. A proactive approach safeguards your home from potential water-related issues.
Mitigating Interior Damage
A compromised roof can lead to extensive interior damage. Leaks from a damaged roof can affect ceilings, walls, insulation, and even electrical systems. Quick repairs are key to mitigating interior damage, reducing the risk of costly and extensive repairs down the line.
Preserving Structural Integrity
Your roof plays a pivotal role in maintaining the structural integrity of your home. Delaying roof repairs after a storm can result in further deterioration, jeopardizing the stability of your entire structure. Timely action is crucial to preserving your home's strength and durability.
Avoiding Mold Growth
Moisture that penetrates a damaged roof creates an ideal environment for mold growth. Mold can proliferate rapidly, posing health risks and requiring extensive remediation efforts. Prompt roof repairs mitigate the risk of mold infestation, safeguarding the health of your home and its occupants.
Preventing Energy Loss
A compromised roof allows conditioned air to escape, leading to energy inefficiency and higher utility bills. Swift roof repairs help maintain a tight and well-insulated building envelope, ensuring optimal energy efficiency and keeping your home comfortable.
Minimizing Long-Term Costs
Addressing roof damage promptly minimizes long-term repair costs. Procrastination can result in the need for more extensive repairs or even a complete roof replacement. Timely action not only protects your home but also saves you money in the long run.
The aftermath of a storm demands quick and decisive action, especially when it comes to roof repairs. Acting promptly not only protects your home from immediate threats but also prevents long-term damage and costly repairs. If your home or business faces storm-related damage, SERVPRO of Carthage/Joplin is here 24/7 to provide professional restoration services. Your peace of mind is our top priority!
Tips for Preventing Candle Fires
12/13/2023 (Permalink)
 Candles can bring warmth and comfort to your home, but they can also pose fire hazards when not used with caution.
Candles add a warm and cozy ambiance to our homes, but it's crucial to use them safely to prevent candle fires. A relaxing evening can turn into a disaster when candles are left unattended or placed too close to flammable materials. In this blog, we'll provide valuable tips and insights on preventing candle fires in your home, so you can enjoy the beauty of candles without the worry of fire hazards.
Choose Safe Candle Placement
One of the most critical aspects of candle safety is where you place them. Keep candles at least 12 inches away from anything flammable, such as curtains, furniture, or decorations. Always set candles on a stable, non-combustible surface.
Use Candle Holders
Opt for sturdy candle holders specifically designed for the size and type of candle you're using. They should catch any drips or wax that may fall. Avoid using plastic or wooden holders.
Keep Candles Away from Drafts
Avoid placing candles in drafty areas as this can cause the flame to flicker and potentially ignite nearby items. Make sure windows and doors are closed near lit candles.
Never Leave Candles Unattended
One of the most common causes of candle fires is leaving them unattended. If you need to leave the room or go to sleep, extinguish the candle.
Use Flameless Candles
For those who prefer a worry-free candle experience, consider using flameless candles. These LED-powered alternatives offer a safe and realistic candle-like glow without the fire risk.
Trim Wick Length
Before lighting a candle, trim the wick to about 1/4 inch. A longer wick can lead to a larger, more erratic flame that may cause dripping or sparks.
Use Candle Accessories
Place a heat-resistant plate or a hurricane glass around the candle to provide an extra layer of protection. This can catch any wax drips and contain the flame.
Keep Candles Out of Reach
If you have pets or small children, make sure that lit candles are out of their reach to avoid accidents.
Don't Overcrowd
When using multiple candles, ensure they're spaced appropriately to prevent heat from one candle affecting another. This helps prevent accidental fires.
Extinguish Candles Properly
Use a candle snuffer to extinguish candles to avoid blowing hot wax and embers. Check that the flame is entirely out before leaving the room.
Candles can bring warmth and comfort to your home, but they can also pose fire hazards when not used with caution. By following these safety tips and practicing responsible candle use, you can enjoy the ambiance without the worry of candle fires. Protect your home, your loved ones, and your peace of mind by incorporating these preventive measures into your candle-lit moments.
A Step-by-Step Guide to Mold Remediation
11/8/2023 (Permalink)
 Mold is a common concern for homeowners in Joplin, MO, given the diverse climate.
Mold is a common concern for homeowners in Joplin, MO, given our diverse climate. At SERVPRO® of Carthage/Joplin, we understand the importance of a comprehensive mold remediation process. In this blog, we will take you through the step-by-step mold remediation process, helping you understand how we tackle mold issues in your home effectively.
Step 1: Initial Contact
The journey begins when you reach out to SERVPRO® of Carthage/Joplin. Our friendly team is ready to listen to your concerns and schedule a convenient appointment for an assessment.
Step 2: Inspection and Assessment
Our experienced technicians will arrive at your property and conduct a thorough inspection. We identify the extent of the mold infestation and assess the areas affected. This assessment helps us tailor our remediation plan to your specific needs.
Step 3: Containment
To prevent mold from spreading to unaffected areas, we establish containment. Our team uses advanced techniques such as negative air pressure chambers and physical barriers to isolate the affected areas.
Step 4: Air Filtration
We utilize high-efficiency particulate air (HEPA) filtration systems to capture mold spores from the air. This ensures a cleaner and safer environment during the remediation process.
Step 5: Mold Removal
The actual mold removal process involves the safe and efficient removal of mold-infested materials. Our team carefully follows industry best practices to eliminate mold colonies and prevent their return.
Step 6: Cleaning and Sanitization
We use specialized cleaning products to clean and sanitize the affected surfaces. This step helps eliminate mold residue and prevents future mold growth.
Step 7: Restoration
Once mold removal and cleaning are complete, our focus shifts to restoring your property to its pre-mold condition. This may involve minor repairs, such as replacing drywall or flooring.
Step 8: Final Inspection
Our experts conduct a final inspection to ensure that the mold remediation process has been successful. We want to ensure your property is mold-free and safe.
Step 9: Prevention Recommendations
To reduce the risk of future mold problems, we provide recommendations for preventive measures. This may include addressing any underlying moisture issues.
Mold remediation is a comprehensive process that requires expertise and precision. At SERVPRO® of Carthage/Joplin, we take pride in our step-by-step approach to mold remediation, ensuring your home is safe and mold-free. If you're dealing with mold issues in Joplin, MO, don't hesitate to contact us. We're here to help you protect your property and your peace of mind.
Strengthening Your Missouri Home's Defenses Against Water Damage
10/8/2023 (Permalink)
 There are proactive steps you can take to enhance your home's resilience against water damage.
Water damage is a common concern for homeowners in Missouri, whether from heavy rains, flooding, or plumbing mishaps. Fortunately, there are proactive steps you can take to enhance your home's resilience against water damage. In this blog, we'll provide you with essential tips and insights to help you safeguard your Missouri home.
1. Maintain Your Roof
Your roof is your first line of defense against water intrusion. Regularly inspect it for missing shingles, damaged flashing, or signs of wear and tear. Address any issues promptly to prevent roof leaks during heavy rains.
2. Clean and Maintain Gutters
Clogged or damaged gutters can lead to water overflow, which can damage your roof, siding, and foundation. Clean your gutters regularly and ensure that downspouts direct water away from your home's foundation.
3. Properly Seal Windows and Doors
Inspect the seals around your windows and doors regularly. Apply weatherstripping or caulk to seal any gaps or cracks, preventing water from infiltrating your home during rainstorms.
4. Invest in Proper Grading
Ensure that your yard's slope promotes proper drainage away from your home's foundation. Proper grading prevents water from pooling around your house, reducing the risk of basement flooding and foundation issues.
5. Install a Sump Pump
In areas prone to basement flooding, consider installing a sump pump. This device can help remove excess groundwater, preventing basement flooding during heavy rains.
6. Upgrade to Steel-Braided Hoses
Replace standard rubber hoses in appliances like washing machines and dishwashers with steel-braided ones. These are more durable and less prone to bursting or leaking.
7. Regular Plumbing Maintenance
Inspect your plumbing for leaks and drips regularly. Address any plumbing issues promptly, as even small leaks can lead to significant water damage over time.
8. Monitor Indoor Humidity
Maintain indoor humidity levels between 30-50% to prevent condensation and moisture-related issues. Use a dehumidifier if necessary, especially during humid Missouri summers.
9. Advanced Leak Detection
Consider installing water leak detection devices that can alert you to potential problems. Some devices can automatically shut off the water supply if a leak is detected.
Enhancing your Missouri home's resilience against water damage is a proactive way to protect your investment and keep your living space safe and dry. By following these steps and staying vigilant, you can reduce the risk of water intrusion and the potential costly consequences. If you ever face water damage beyond your control, SERVPRO® of Carthage/Joplin is here to assist Missouri residents with professional cleanup and restoration services. We're dedicated to helping you restore your property to its pre-damage condition, ensuring your home remains resilient and secure.


 24/7 Emergency Service